Seiten

Wednesday, July 29, 2020

Tutorial Sea Decorated Bottle - DT Dusty Attic

Hi creative friends!

 I was inspired to create another illuminated 
glass bottle in altered art.


Tutorial


1 choose some chipboards I used a border and a flourish element

  glue a piece of cheesecloth and the chipboards with construction
  adhesive on the glass bottle

2 create a pillar gate and a little mermaid with airdrying modeling 
   clay and silicone cake moulds,

2a I love to use some leftovers from the chipboards (here the
     bottom conclusion)

     borders are used on the sides


glued the gate and also added some shells and two pieces of driftwood as entrance steps

         afterwards the bottle was completely covered with crackle medium 'Weathered wood' (DecoArt)

4 after drying covered with a chalky finish paint for glass 'Relic' (DecoArt)

let it dry for a few hours

5 now two wax cremes 'Lavish Green' and 'Brilliant Turquoise'

 6   dry brush technique with white gesso to lighten the dark colour


finally added the little mermaid  


 some close up's


 chipboards can be bent around the bottle very well 
after a light moistening with water


here can you see the used leftovers as sea waves 
on the bottle sides 


Dusty Attic chipboards that I used

Fancy Corners + leftovers(negatives)


Bali Border #4


magical effects with a light chain


Thanks for your visit!


Kerstin


Saturday, July 25, 2020

Shadow frame - Little Mermaid

Hello creative friends!

Today a new inspiration for you,
it's a under the sea fairytale inspired shadow frame in mixed media style.

 A very beautiful, but sad tale  - The little mermaid from H.C. Andersen.


side view

more creative Tips can you find here


some close up's


 shadow effect


I want to share this mixed media project here

More than Words  July

 Goodbye beloved sea sisters

 welcome gorgeous human world

or 

Goodbye fear of failure and conformity

welcome love & life

 shades of green


Thanks for your visit!

Happy summer time!
Kerstin


Tuesday, July 21, 2020

Romantic flowers - DT Dusty Attic Moodboard July

Welcome Dusty Attic friends!


Now it is my turn to feature a layout using the delightful Dusty Attic Moodboard for July.


Have you seen this wonderful soft tone colours on our Moodboard this month? it looks like a peony one of my favourite flowers in my garden. For this layout I used a very romantic summer picture with a straw hat and some hortensias and a background paper from 13arts 'Secret letters' from the Rosalie collection.

some close up's


more details can you find here

I hope I could inspire you to take time again for the beautiful things in life!

We are looking forward to see what you come up with this months challenge.
 Just put your own take of the challenge in the comments section of the Dusty FANattics facebook page HERE 


You could win one of two amazing Dusty Attic prize packs.
 
Happy crafting!
Thanks for your visit!


Kerstin


Friday, July 17, 2020

Sea View DT Maja Design

Welcome creative friends!

Today a mixed media layout in shabby chic style as memory on wonderful days 
with our little sunshine 'Filou' by the sea. 

I was inspired to create a maritim inspired layout, 
where I used some wooden shapes (Calico Craft Parts), cutting dies, 
origin beach sand and self-assembled shells :-).  


more details can you find here


Happy Summertime!

Kerstin


Saturday, July 11, 2020

Day at the seaside - Homedecor with shelf

Welcome!

Today a new inspiration suitable to the season. Live summer feelings on the beach with roaring sea waves, salty healthy air and long walks on the beach until sunset.

In short, a project like from a holiday project, it seems as if someone has a longing for the sea.


how you can create a shelf in shabby chic look
can you find here


some close up's


used Calico Craft Parts

Tudor Arch Shape - MDF Mixed Media Board


MDF Wood Corner Style 18 - Ship's Wheel

Rectangle Shape with Notched Corners - MDF Mixed Media Board size 100 x 50 mm


Lighthouse MDF Wood Shape Style 8

Beach Chairs and Umbrella

Wild Grass MDF Wood Shape - Style 1

 Word Elements - Summer & Seaside


Thanks for your visit!

Happy summer time!
Kerstin

Sunday, July 5, 2020

It's magic - An ornate owl in forest

Hi creative friends!

I was inspired to create a new glass bottle in altered art.  On the last three bottles I worked with chipboards, wooden shapes and moulds. now I wanted to try out if this also works with cutting dies and can trigger this magic lighting effect.

I always love to make my projects very lively and close to nature. 
For this bottle I developed the idea of building a roof out of bark.


Tips & Tricks 

DIY a bark roof


Sizzix 3D Texture fades 'Lumber'
Sizzix Bigz 'Planks'
Ranger Distress stain -walnut stain -
Distress crayon -vintage photo-


1. first punch out different sizes of the planks

2. embossing a wooden structure

3. use firstly Distress Stain and then the Distress crayon, I like to smudge it with my fingers

4. I divided some planks again and applied a total of 10 strips around the bottle with
    construction ahesive

5.  for a better fixation I have wrapped a firm strip around it and I bent the lower ends
     slightly upwards

6. now you can decorate the whole bark roof, I used moss, ivy leaves (Sizzix cutting die
   'Garden Greens' and  jute


some close up's


the owl is so old and wise that it has already grown moss


I also used some another cutting dies from Sizzix 

Bigz Die 'Branches'; 'Branch Tree'; 

Thinlits 'Ornate Owl'; 'Stacked Archway'; Garden Greens
Texture fades die Tree Rings


Happy sunday!

Kerstin


Wednesday, July 1, 2020

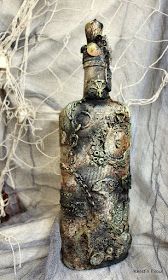
Mixed Media Steampunk Bottle


  Welcome to our annual Summer Special, dear steampunk and industrial style friends!

 I would like to invite you to play along with our two months 
 It is an "Anything Goes - Steampunk/Industrial" themed one again and instead of the usual month you have until the end of August to enter up to five (instead of the usual three) entries this time.

I was inspired to create a steampunk bottle in altered art. 
I discovered my new creative passion in the last weeks. I simply love to work 
with moulds and modelling clay. 
Here is an upcyling idea, I used a liquor bottle as base
 and modeled with silicone moulds as well as self  by hand.


 Tips & Tricks 


I used silicone moulds from several brands (Prima Marketing, Katy Sue design, Stamperia)
 and always worked with airdrying modelling clay and construction adhesive.

 I always find it exciting to not only use the casts as a whole, but to share them and puzzle them together in a new way to create completely new pictures and impressions.

 This looks a bit wild at first, but with a good primer it will become respectable again. 
For this I like to use the chalky finish paints from DecoArt.


But modelling by yourself is also fun and reminds you of childhood days, when you liked to play with plasticine.
 These are my first attempts to form corals. 

I formed small balls and drilled holes into them with a wooden rod. The starfish was created with the help of a small plastic ball and a comb, sounds a bit adventurous, but you use it to create the linear structures. I just realized that it would be better to illustrate it with pictures, but as I said the first tries, there are no pictures, but if you are interested, I will do it in a new project.  

As there are many structures and deepenings in the casts, the work
with liquid colours like spray paint or distress ink is always very effective.
For a cool finish look I love to use only some wax cremes,
here Metallic Lustre 'Lavish Green', Champagne Ice and 'Iced Espresso'.


 some close up's


 My  teamies at SASPC have come up with many
inspiring and different versions
on this Steampunk/ Industrial summer special challenge.


Please have a look and feel you inspired to create your own idea.
We are looking forward to see your new creations!

Happy summertime!

Kerstin